PcHelpWare Introduction
Download PcHelpWare components (in Zip file format)
PcHelpWare is basically made of three parts:
- A Viewer that is used to remote control a distant PC
- A Server that runs on the distant PC
- An optional Repeater that helps the Viewer and the Server to connect together. It is actually a mediation-proxy service.
Viewer and Server can be customized to fit your needs (see Part 3, Part 4 and Customization pages)
PcHelpWare has two main connectivity schemes:
- Direct connection (can be used when only the server PC is behind a NAT router or simply not directly reachable) Server -> Viewer
- Connection through a repeater (can be used when both Viewer and Server PCs are behind their own NAT router) Server -> Repeater <- Viewer
Notes:
- PC standing behind a NAT means that this PC can't be easily reached from outside (from the Internet)
- You must run the Viewer on your machine. The individual you want to help must run the Server on his machine. Even if this machine is behind a NAT the connection can be done because this connection is initiated by the Server from behind the NAT router to the Viewer over the internet.
See Part 2 for more details on connection modes and settings.
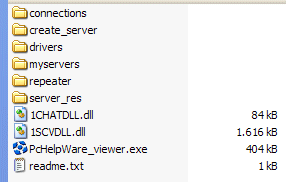
PcHelpWare Zip file contents

> Folders
-
- Connections:
This folder is used the save Viewer profiles
- Create_server:
This folder contain the needed files to generate the customized Server exe
- Drivers:
If you wish to speedup your connections, you can install special Mirror Drivers under Windows 2000, XP and Vista.
- My Servers:
In this folder you find the generated Servers. The Servers are saved in a sub folder with the same name then the Viewer profile
- Repeater:
This folder contains the Repeater. An instance is most time running on the uvnc.com Server
- Server_res:
Contain the background and icon of the Server exe. Can be customized.

PcHelpware_viewer.exe
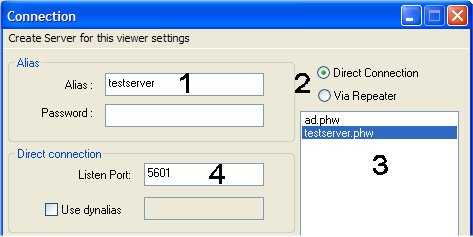
This is the profile name used to save the Viewer A "Direct Connection" is a connection between Server and Viewer, "Via Repeater" uses the repeater as a proxy List of saved Viewer profiles.
Connection modes
Direct connection between Server and Viewer (Viewer <- Server)
Server PC connects to the public host name or ip address of the Viewer PC

- A direct connection requires the Viewer to be accessible from the internet
-> The Viewer PC needs to have an public ip address (ie: reachable from the internet)
-> Your router needs to forward the "Listen Port" (4) to the Viewer PC.
If you are lucky and your router support the MS implementation of UPnP, the Viewer dialog can automatically forward the router ports

(1) and (4) are the only options you have to enter to create a direct connection
To make direct connection to the Viewer easier, the Server can use the Repeater Dynalias functionality
The repeater dynalias is an easy way of handling connections to Viewers that have a dynamic ip address. On Viewer start, the ip address is sent to the repeater service, the same service is used by the Server to ask the ip address of the name (7).

Indirect connection through a Repeater (Server -> Repeater <- Viewer)
Necessary when both the Server and Viewer stand behind NAT routers (typical NAT-to-NAT scheme)

Server
Executable creation
> For each Viewer profile you create you have to create the corresponding Server package that will be able to connect the this listening Viewer


> Once you have made the Viewer configuration/profile you can create the corresponding Server by selecting the top menu or pressing the button (14)
> In case you selected the repeater option, you also need to enter the port used by the repeater to listen for new Server connections (15)


> The Viewer profiles save the password (encrypted) and the Server contains a MD5 hash of this password
> At this stage you have to make two choices:
- Force the user (on Server side) to enter the password when he runs the Server or make the Server automatically use its embedded password hash.
- Force the user to enter the ID or Dynalias or make the Server use its embedded ID and Dynalias


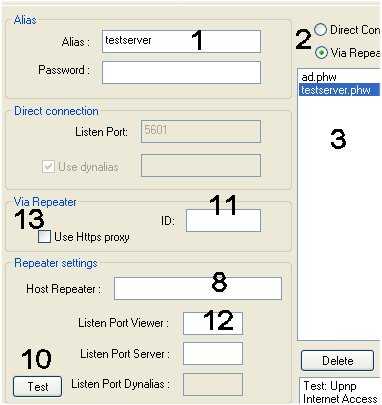
Summary view of Server executable creation

(1) Alias, use for saving profiles
(2) Switch: direct, repeater
(3) List of existing profiles
(4) Port used by the Viewer (listening port)
(5) UPnP
(6) General log window
(7) Dynalias name
(8) Host name repeater
(9) Port dynalias service repeater (5912)
(10) The test button allow to test the repeater (server/viewer/dynalias port)
(11) ID number between 1-9999 to identify this connection
(12) Repeater port use to listen to new Viewer connections
(13) Use https proxy
(14) Create Server
(15) Repeater port used to listen to Server
(16) Password
Viewer usage
Profiles management

> The selected profile can be removed using (18).
> (3) is the list of saved profiles.
> The profiles are saved with file extension .phw in the "Connections" subfolder
Starting the Viewer - Options

> (19) is used to start the Viewer in the selected mode (direct, repeater).
> A running Viewer can by stopped listening with (20).
> (21) quits the application
> The quality of the image can be selected with (22).
- High is full color high quality mix of jpeg and zlib
- Mid is mix of lower quality jpeg and zlib
- Low is 4bit gray scale image especially adapted to slow connections
Depending on the bandwidth some quality setting can be to slow
> Disable directX: On some PCs there is a problem to detect the correct directx behavior.
This option allows to manually cancel directX
> Auto Reconnect: Once the initial connection is finished, the Viewer puts himself back in listen mode
or reconnects himself with the repeater. It is very useful in case of broken connection.
> Debug: internal use
Viewer toolbar functions

(1) Smaller viewer
(2) Bigger viewer
(3) Fullscreen on/off
(4) Force complete screen refresh
(5) Unlock Server input
(6) Show transparent layers (XP)
(7) Open Chat window
(8) Use CTRL-ALT-C to sync clipboard
(9) Exit viewer
(10) Lock Server input
(11) Use CTRL+C to sync clipboard (all data is synced)

